Learning to draw can feel like a big challenge, especially when you look at something as detailed as a car. Many people wish they could draw a car well. Perhaps it is for a fun hobby. Or maybe it is for a school project. You might think it is too hard. But with some helpful guidance, drawing a car becomes very easy. This guide is perfect for beginners and kids who want to draw cars easily at home. It is, you know, a simple way to start.
Drawing a car, it is true, can seem a bit daunting at first glance. There are so many curves. There are many straight lines. You have all those tiny details. Yet, when you break it down, it is really just a series of simple shapes. We will show you how to do just that. This fun tutorial by USP Crafts Studio will help you. It will make the process very clear. You will be surprised at how quickly you pick it up. It is, arguably, a lot easier than you think.
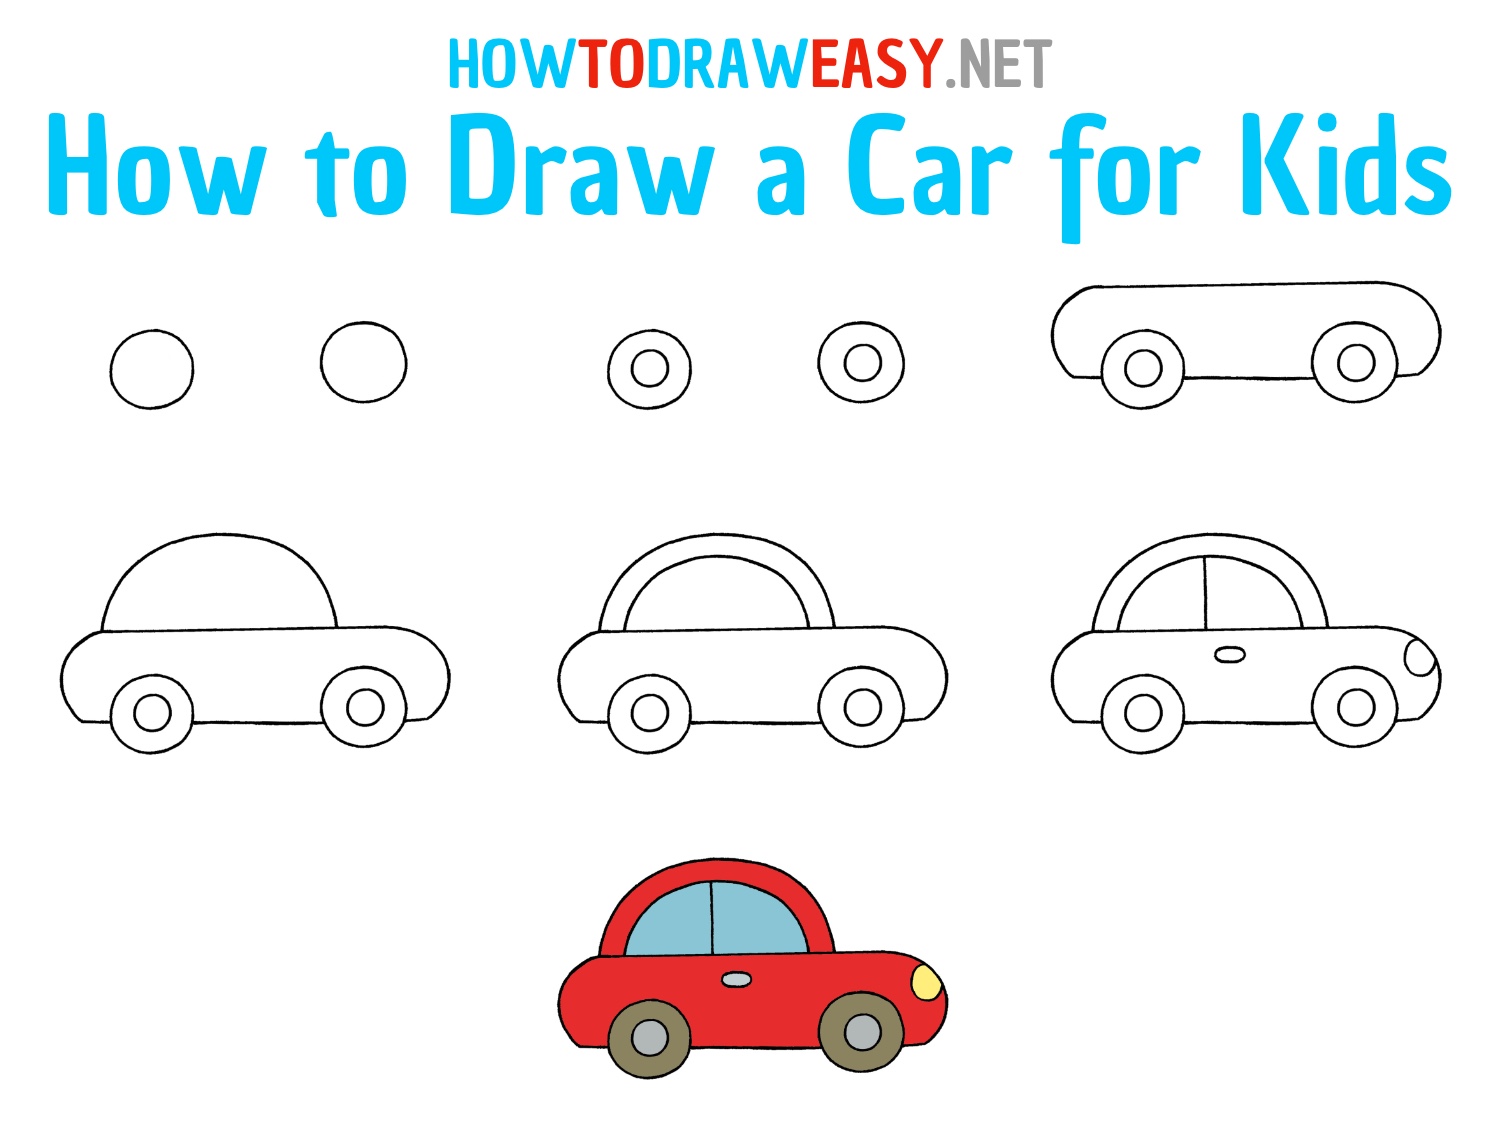
In this drawing lesson, we will show you how to draw a car step by step. We have a total of 13 phases here. We will create a car. It will be a very easy tutorial, indeed. Let us learn how to draw a car with simple steps that you can print and practice. Kids can make their own car drawing because the instructions are broken down into small, manageable parts. You will learn to draw a car easily. You will master basic shapes and perspectives for quick, confident sketches. This is, basically, a great starting point for anyone.
Table of Contents
- Why Learn to Draw Cars Easily?
- Getting Started: Your Drawing Tools
- The 13 Easy Phases of Car Drawing
- Phase 1: The Basic Rectangle
- Phase 2: Adding the Roof Shape
- Phase 3: Placing the Wheels
- Phase 4: Connecting the Wheel Arches
- Phase 5: The Windshield and Windows
- Phase 6: The Car Body Lines
- Phase 7: Defining the Hood and Trunk
- Phase 8: Adding the Door and Side Mirror
- Phase 9: Details for the Front
- Phase 10: The Headlights and Grille
- Phase 11: The Wheels and Tires
- Phase 12: Finalizing the Outlines
- Phase 13: Erasing and Refining
- Tips for Making Your Car Drawing Even Better
- Frequently Asked Questions About Car Drawing
- Start Your Car Drawing Adventure Today!
Why Learn to Draw Cars Easily?
Learning to draw cars easily offers many good things. For kids, it is a fun way to express creativity. It helps them with their hand-eye coordination. It is also a good way to develop fine motor skills. For adults, drawing can be a very relaxing activity. It helps reduce stress. It is a creative outlet. You might want to sketch your dream car. Or perhaps you want to draw a favorite classic model. Knowing how to draw cars simply makes it possible for anyone to try. It is, in some respects, a very rewarding skill to pick up. You might even find it quite meditative.
The ability to draw something familiar, like a car, can build confidence. When you see your drawing take shape, it feels good. It shows you that you can learn new things. This confidence can then carry over to other areas of your life. It is also a skill that you can share with others. You can teach your friends. You can teach your family members. You can even create personalized gifts. So, it is not just about drawing a car. It is about growing your abilities. It is about finding joy in making something. This is, you know, a big part of the appeal.
Also, the world around us is full of cars. They are everywhere. Being able to draw them helps you observe things more closely. You notice the shapes. You see the lines. You pay attention to the details. This kind of observation is good for your brain. It makes you more aware of your surroundings. It is, basically, a way to sharpen your vision. And, of course, it is just plain fun to draw something you like. That is, truly, a good reason to start. You can find more information about drawing techniques on our site. Learn more about drawing basics on our site.
Getting Started: Your Drawing Tools
You do not need many fancy supplies to begin drawing cars. A simple pencil will do. An eraser is also very important. You will use it often. Some paper, any kind, is perfect. You can use printer paper. You can use a sketchbook. That is all you really need to start. These basic tools are enough to get going. You can, of course, always add more later. But for now, keep it simple. This approach, you know, makes it very accessible for everyone. It means you can start right away.
If you want to get a little more serious, you might consider different pencils. A harder pencil, like an H or 2H, makes light lines. These lines are good for initial sketches. They are easy to erase. A softer pencil, like a B or 2B, makes darker lines. These are good for outlining your final drawing. They create a bolder look. A kneaded eraser is also helpful. It picks up graphite without smudging. It is, you know, a bit different from a regular eraser. But, truly, any pencil and paper will work for this tutorial. You can find art supplies at your local craft store or online at places like Blick Art Materials. This is, basically, all about getting started easily.
The 13 Easy Phases of Car Drawing
Let us draw a car together. This fun tutorial will guide you. We will go through 13 simple phases. Each phase builds on the one before it. You will see your car take shape. It will be very clear. Just follow along. Do not worry about perfection. The idea is to have fun. It is about learning the steps. You will find it is quite manageable. This is, you know, a very straightforward approach.
Phase 1: The Basic Rectangle
Start by drawing a simple rectangle. This rectangle will be the main body of your car. Make it light. Do not press too hard with your pencil. This is just a guide. It is the foundation for everything else. You can make it longer or shorter. That will change the type of car you draw. A longer rectangle might be a sedan. A shorter one could be a sports car. It is, you know, the very first step. This shape is, basically, your starting point.
Phase 2: Adding the Roof Shape
Now, draw the roof of the car. This shape will sit on top of your rectangle. Think of it as another simple form. It might be a slightly curved line. It could be a more angled line. Connect it to the top corners of your rectangle. This gives your car its overall silhouette. The roof line, you know, really defines the car's style. It is, perhaps, one of the most important early choices you make. This part is, actually, quite fun to experiment with.
Phase 3: Placing the Wheels
Next, draw two circles for the wheels. Place them under the rectangle. Make sure they are roughly the same size. Also, make sure they are somewhat evenly spaced. These circles will become your wheels. Do not worry if they are not perfect circles. You can fix them later. They are just placeholders for now. It is, in a way, like marking where the tires will go. This step, basically, gives your car its movement. It is, very, very important for the overall look.
Phase 4: Connecting the Wheel Arches
Draw curves over the top of each wheel. These curves are the wheel arches. They connect to the main body of the car. They help define where the wheels sit within the car's structure. These lines should flow smoothly from the car's side. They should curve gently over the wheels. This gives the car a more complete look. It is, you know, a subtle but important detail. This step, pretty much, starts to make the car look more like a car.
Phase 5: The Windshield and Windows
Inside the roof shape, draw lines for the windshield and side windows. These lines will follow the shape of your roof. They will also follow the top of the car's body. Think of them as simple rectangles or trapezoids. The windshield will be at the front of the roof. The side windows will be along the side. This step, arguably, brings light into your car. It helps you see inside the vehicle. It is, in a way, making the car feel more real.
Phase 6: The Car Body Lines
Now, refine the main body lines of the car. Go over the initial rectangle. Make the lines smoother. Add slight curves where needed. Think about the flow of the car's design. This is where you start to make your car look sleek. Or perhaps you want it to look rugged. It is up to you. These lines, you know, give the car its unique character. This is, basically, where the car starts to get its personality.
Phase 7: Defining the Hood and Trunk
Draw lines to define the hood at the front of the car. Also, draw lines for the trunk at the back. These lines will usually be horizontal. They will run from the edges of the car's body. They help separate these sections from the main cabin. This gives the car a more finished look. It is, you know, a very clear way to show different parts. This step, more or less, adds structure to the car's ends.
Phase 8: Adding the Door and Side Mirror
Draw a line for the car door. This line will run vertically down the side of the car. It will separate the front from the back passenger area. Then, add a small shape for the side mirror. Place it near the front window. It usually sticks out a little. This adds a functional detail. It is, perhaps, a small thing. But it makes a big difference in realism. This step, apparently, makes the car feel ready to drive.
Phase 9: Details for the Front
Add some details to the front of your car. This could include a bumper line. It could be a simple line across the bottom front. You might add a small line for the grille. This is where air goes into the engine. These details, you know, make the front of the car more interesting. They give it a face, in a way. This part is, typically, where you start to see your car's identity.
Phase 10: The Headlights and Grille
Draw the headlights. They are usually at the front corners of the car. They can be circles. They can be rectangles. They can be more complex shapes. Then, draw the main grille. This is often a larger rectangular or oval shape in the center front. It is, you know, where the car "breathes." These features really make the car look complete. This is, basically, what gives the car its expression. It is, actually, a very important part.
Phase 11: The Wheels and Tires
Refine the circles you drew for the wheels. Make them look more like tires. Add a smaller circle inside each wheel for the hubcap or rim. You can add even smaller details inside these circles. These could be spokes. They could be simple lines. This gives the wheels a lot more character. It is, you know, what makes the car look ready to roll. This step, more or less, brings the wheels to life.
Phase 12: Finalizing the Outlines
Now, go over all your final lines. Make them darker. Press a little harder with your pencil. This makes your car stand out. It makes the drawing look finished. You are essentially tracing over the lines you want to keep. Be careful and take your time. This is, you know, the stage where your drawing really pops. It is, perhaps, the most satisfying part of the process. This step, frankly, makes all your hard work visible.
Phase 13: Erasing and Refining
Erase all the light, initial guide lines. These are the lines you drew in the first few phases. Use your eraser carefully. Make sure you only remove the lines you do not need. Then, look at your drawing. See if there are any small adjustments you want to make. You might add a shadow. You might add a small detail. This is your chance to make it perfect for you. It is, you know, the clean-up phase. This is, basically, where you put the finishing touches.
Tips for Making Your Car Drawing Even Better
Practice often. The more you draw, the better you will get. It is like any skill. Repetition helps you improve. Try drawing different types of cars. A truck will have different shapes than a small car. A sports car will look different from a family car. This helps you understand various car designs. It also keeps things interesting. You will find, you know, that each drawing teaches you something new. This is, perhaps, the best way to get good.
Use reference photos. Look at real cars. Look at pictures of cars. Notice how the light hits them. See where the shadows fall. Pay attention to the details. This will help your drawings look more realistic. It is, in a way, like doing research for your art. You can find many car images online. Carwale is one of India's leading sources of new car pricing and other car-related information. Carwale exists to simplify car buying in India and helps you buy the right car at the right price. Search used cars, research vehicle models, and compare cars, all online at Carmax. Unbiased car reviews and over a million opinions and photos from real people. Use Cargurus to find the best used car deals. Race cars at high speeds and drift around tight corners in our complete collection of free online car games. Play now in your web browser. A free Carfax report comes with every used car and truck for sale on Carfax. Research new and used cars including car prices, view incentives and dealer inventory listings, compare vehicles, get car buying advice and reviews at Edmunds. Find your next new car, used car, truck, or SUV including pricing and features, find a car dealer near you, calculate payments or make a service appointment and so much more on Autonation. Search used car listings to find the best deals. Use the best tools & resources to help with your purchase. We analyze millions of used cars daily. Buy & sell cars, bikes, auto parts & accessories in Pakistan. Post ad for free and reach thousands of buyers. Discuss & read everything related to automobiles. All these resources can give you ideas for your drawings. This is, obviously, a great way to get inspiration.
Do not be afraid to make mistakes. Mistakes are part of learning. They help you see what you can do better next time. Just keep going. Enjoy the process. Drawing is about having fun. It is about expressing yourself. It is not about being perfect from the start. Every artist, you know, makes mistakes. That is how they learn. So, just relax and enjoy your time drawing. This is, literally, the most important advice. You can also explore other drawing tutorials on our site for more ideas.
Frequently Asked Questions About Car Drawing
Here are some common questions people ask about drawing cars.
Is it hard to draw a car for a beginner?
No, it is not hard to draw a car for a beginner. It can seem that way at first glance. But with simple, step-by-step instructions, it becomes very manageable. Our 13-phase tutorial breaks it down into small, easy parts. You start with basic shapes. You add details slowly. Anyone can do it. It is, you know, just about taking it one step at a time.
What are the basic shapes to start drawing a car?
The most basic shapes to start drawing a car are rectangles and circles. You begin with a main rectangle for the car's body. Then you add a simpler shape, like a curved line, for the roof. Circles become your wheels. From these few simple forms, you build the rest of the car. It is, basically, like building with blocks. You just add more shapes to create the full picture.
How can kids make a car drawing?
Kids can make a car drawing by following simple, broken-down instructions. Our tutorial is designed for them too. It uses easy shapes. It has clear steps. They can print the steps and practice at home. It helps them feel good about their art. It is, perhaps, a very good activity for a rainy day. They will, you know, be proud of what they create. It is, truly, a fun way for them to be creative.
Start Your Car Drawing Adventure Today!
Drawing a car, you see, does not have to be a big mystery. With these simple steps, you can create your own car drawings. Whether you are a beginner, or you are drawing with kids, this guide helps. It makes the process fun. It makes it easy. So, grab your pencil. Get some paper. Let us make some cool car art together. It is, basically, time to start your creative engine. You will find it is a very rewarding activity. This is, you know, a great way to spend some time.
- Alex Van Halen 2024
- Nathan Fillion One Life To Live
- Intex Solar Pool Cover
- Jordan Wiseley Movies And Tv Shows
- Dominic Chianese Album