Have you ever felt a little stumped when trying to draw hands, especially a strong, clenched fist? It's a pretty common feeling, you know, for many folks who enjoy putting pencil to paper. A fist, after all, carries so much meaning in art – it can show strength, determination, or even a bit of frustration. Getting it just right can feel like a big win for your artwork, and honestly, it’s a skill that truly adds a lot of life to your characters and scenes.
Well, you're in a good spot today, because this guide is all about showing you how to draw a fist. We're going to break it down into easy, manageable steps, so you can pick up the basics and then some. Whether you're just starting out with your drawing tools or you've been sketching for a while and just want to get better at hands, this information is for you. We'll explore various ways to capture this powerful gesture, making it simple and fun to learn.
We'll walk through everything from the very first lines to adding those subtle details that make a fist look truly real and alive. You'll find out how to draw a fist from different angles, and we'll even touch on making it look like it's coming right at you! By the time we're done, you'll be pretty surprised, I think, at how straightforward it can be to create a great-looking fist, even if you're just a beginner. So, grab your drawing supplies, and let's get started on making some truly expressive hands!
- Engagement Ring Royal
- National Geographic June 1985
- Who Is The Voice Of Shadow In Sonic 3
- Red Light On Alexa
- Is Megan Fox Bi
Table of Contents
- Getting Started with Fist Drawing
- Understanding the Basic Shapes
- Drawing Fists from Different Angles
- Adding Detail and Realism
- Exploring Different Fist Styles
- Common Mistakes and How to Fix Them
- Practice and Repetition: Your Path to Perfection
- Frequently Asked Questions About Drawing Fists
- Your Next Steps in Drawing Fists
Getting Started with Fist Drawing
Why Draw Fists?
Drawing hands, and specifically fists, is a pretty important skill for any artist, you know, whether you're just doodling or creating something really serious. A clenched hand can really tell a story without any words at all. It can show a character's anger, their joy, their determination, or even a quiet strength. When you get good at drawing fists, your characters will feel much more alive and believable, which is really what we're aiming for, isn't it?
This guide, you see, is built to help anyone, from young artists just picking up a pencil to grown-ups who want to improve their skills. The way I approach drawing fists, I think, makes it pretty simple for everyone to follow along. It’s all about breaking down something that seems a bit tricky into small, easy pieces.
Essential Tools for Your Art
Before we jump into the actual drawing, it’s good to have a few basic supplies ready. You don't need anything fancy, honestly, just some simple things. A regular pencil, maybe a few with different softness levels like a 2B for sketching and a 4B or 6B for darker lines and shading, will do the trick. A good eraser is also super helpful for making corrections, and some drawing paper, of course.
- 1113 Meaning
- Cyst On Dogs Paw
- Adam Levine How Tall
- Country Singer Johnny Rodriguez
- Has Leonardo Dicaprio Ever Been Married
If you prefer working digitally, that's totally fine too! A digital tablet and your favorite drawing app will work just as well. The principles we'll talk about here, you know, apply whether you're drawing with traditional tools or on a screen. The main thing is to have something to draw with and something to draw on.
Understanding the Basic Shapes
The secret to drawing anything that looks real, including a fist, is to start with simple shapes. Think of it like building blocks. You don't just start drawing all the tiny details right away. Instead, you lay down a solid foundation. This approach, you'll find, makes the whole process a lot less overwhelming, and it really helps you get the proportions right from the start.
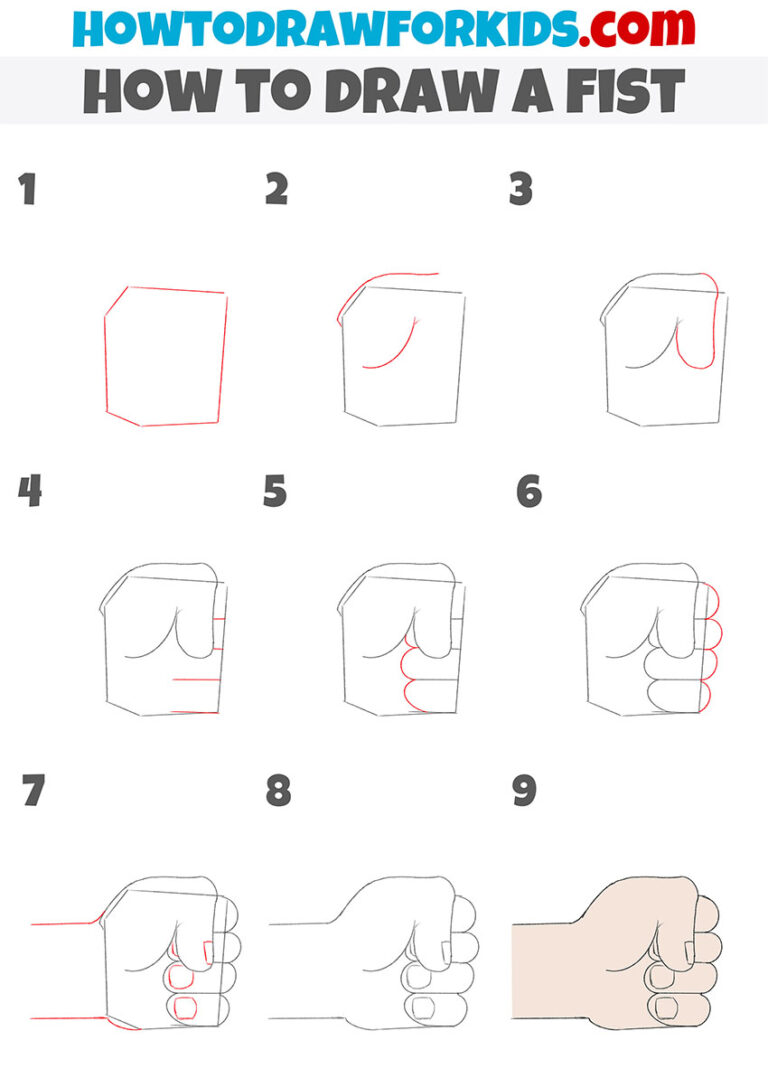
The Box Method for Fists
One of the easiest ways to begin, I've found, is to think of the fist as a kind of box or a couple of rectangular prisms. You can start by sketching a larger rectangular shape for the main part of the hand, where the knuckles are, and then a slightly smaller one for the thumb area. This basic box, you know, gives you a simple structure to build upon. It helps you place the hand in space and get its overall size right before you add any curves or specific features.
This method is pretty much a game-changer for beginners, as a matter of fact. It simplifies the hand into something much easier to manage. You’re not trying to draw fingers and knuckles right away; you’re just getting the general volume and direction. This is a crucial step, really, for any successful drawing of a hand.
Breaking Down the Structure
Once you have your basic box, you can start to think about the underlying structure of the hand. Even though it's a fist, there's still a bone structure underneath, you know, that gives it its shape. Imagine the bones of the palm and fingers, even though they're hidden. This helps you understand where the knuckles will bulge out and where the fingers will curl in.
You can lightly sketch in where the wrist might connect and where the main knuckle line would be. This initial breakdown of the basic shape and structure is what makes the rest of the drawing process so much smoother. It's like having a map before you start your trip, you know?
Drawing Fists from Different Angles
A fist looks quite different depending on the angle you're viewing it from. To really make your art dynamic, it's super helpful to practice drawing fists from various perspectives. This way, you can show a lot more emotion and movement in your characters. We'll go through a few common views, so you can get a good handle on each one.
Front View: A Straight-On Look
For a front view, you're looking directly at the knuckles. Start with that basic box shape for the main part of the hand. Then, you'll want to gently sketch in the rounded forms of the knuckles. The thumb will usually be tucked in, sort of, on the side, or resting across the top of the curled fingers. Pay attention to how the fingers curl inwards and how the palm creases. This view, you know, really shows off the power of the knuckles.
Side View: Capturing the Profile
When drawing a fist from the side, you'll see the profile of the hand. Start with a more elongated box shape. You'll clearly see the curve of the fingers as they curl into the palm, and the distinct shape of the thumb. The wrist connection will also be very clear here. This view, you know, is great for showing the length and general shape of the clenched hand. It's a pretty common view in many action poses.
Back View: The Knuckles Show
The back view of a fist is all about the knuckles and the back of the hand. Again, start with your box. You'll emphasize the prominent knuckles and the tendons that might show slightly on the back of the hand. The thumb might be less visible, depending on how tightly the fist is clenched. This perspective, you see, can be really expressive for showing tension or readiness.
Fist Coming Towards You: A Dynamic Pose
Drawing a fist coming towards the viewer, or in "foreshortening," can seem a bit tricky, but it's really cool for dynamic poses. You'll make the part of the fist closest to you appear larger, and the parts further away will seem smaller. This means the knuckles will be quite prominent, and the wrist might appear very short or almost hidden. It's all about creating the illusion of depth, and it really adds a lot of energy to your drawing, you know.
Fist Up in the Air: Showing Emotion
A fist raised high, up in the air, often conveys triumph, protest, or excitement. When drawing this, consider the angle of the wrist and forearm. The fist itself might be viewed from a slightly different angle, perhaps from below, emphasizing its upward movement. This pose, you know, is about capturing a feeling, a moment of strong emotion.
Adding Detail and Realism
Once you have the basic shapes and angles down, it's time to bring your fist to life with details. This is where your drawing starts to really look like a hand and not just a simple form. It's also where you can add a lot of personality to your art, you know, making it feel more real.
Skin Folds and Creases
Hands, especially when clenched, have lots of little skin folds and creases. These are important for making your fist look believable. Look at your own hand when you make a fist. You'll see lines on the knuckles, around the base of the thumb, and on the palm side where the fingers meet the hand. Don't overdo them, but adding these subtle lines, you know, really helps to define the form and show the tension of the clenched hand.
Shading to Create Depth
Shading is what turns your flat drawing into something that looks three-dimensional. It's about showing where light hits the fist and where shadows fall. Think about your light source: Is it coming from above, the side, or below? The parts of the fist facing the light will be brighter, and the parts turned away will be darker.
You can use your pencils to create different tones, from very light grays to deep blacks. Start with lighter shades for the overall form, then gradually add darker tones in the creases and under the knuckles. This process, you know, really makes the fist pop off the page and gives it a sense of weight and volume. It's pretty amazing what a bit of shading can do.
Using References for Accuracy
One of the best ways to improve your drawing, especially for something as complex as a hand, is to use references. Look at your own hand, take photos, or find pictures online. See how the fingers curl, how the thumb rests, and where the wrinkles appear. References, you know, are your best friends for getting those details right. Don't be afraid to study them closely. You can find tons of great reference photos for hands and fists on sites dedicated to art resources, for instance.
When you use a source image as reference, you're not just copying it directly. You're studying it to understand the underlying structure and how the different parts work together. This will help you draw fists from imagination later on, which is, you know, the ultimate goal for many artists.
Exploring Different Fist Styles
The way you draw a fist can also depend on the style of art you're going for. A fist in a realistic drawing will look quite different from one in a cartoon or anime piece. Knowing how to adapt your drawing to different styles, you know, makes you a more versatile artist.
Realistic Fists: Capturing Every Nuance
For a realistic clenched fist, you'll want to pay close attention to anatomy. Think about the bones, muscles, and tendons. The skin folds will be subtle but present, and the shading will be smooth and gradual, creating a soft, lifelike appearance. The goal here, you know, is to make it look as much like an actual human hand as possible, capturing all the tiny details that give it character.
Cartoon and Anime Fists: Simplified and Expressive
Cartoon and anime fists often simplify the forms. They might have fewer wrinkles, and the shapes might be more stylized or exaggerated to convey emotion. For instance, a cartoon fist might have very large, rounded knuckles to show strength, or a very small, cute fist for a more innocent character. The lines might be bolder, and the shading less detailed. It's all about conveying the message with a bit more punch, you know, and often with less strict adherence to anatomical accuracy.
Common Mistakes and How to Fix Them
Everyone makes mistakes when drawing, especially when it comes to hands! It's part of the learning process, really. One common issue is making the fingers too long or too short, or having the thumb look a bit out of place. Another one, you know, is making the fist look flat, without any sense of volume.
To fix these, always go back to your basic shapes. Is your initial box the right size and proportion? Are the fingers curling in a natural way? Using references can help a lot here, too. And remember, shading is your friend for adding that three-dimensional look. Don't be afraid to erase and redraw, because that's how you get better, honestly.
Practice and Repetition: Your Path to Perfection
Learning how to draw a fist is, you know, very simple at its core, but getting truly good at it takes practice. A little repetition goes a long way. The more you draw fists, the more comfortable you'll become with the shapes, the angles, and the details. You'll start to develop a feel for it, and soon, drawing a perfect fist will feel much more natural.
And here's a neat thing: you don't have to follow every single step exactly the way I show it. These are guidelines, you know, to get you started. Feel free to experiment, try different approaches, and find what works best for you. The goal is to understand the principles, not just to copy.
Frequently Asked Questions About Drawing Fists
How do you draw a realistic clenched fist?
To draw a realistic clenched fist, you should start with basic geometric shapes like a rectangular prism for the main hand mass. Then, gradually refine this into the natural curves of the knuckles and fingers. Pay close attention to the anatomy of the hand, including bone structure and muscle definition. Adding subtle skin folds and using careful shading to create depth and volume is pretty important, too. Using a real hand as a reference is, honestly, the best way to capture all those lifelike details.
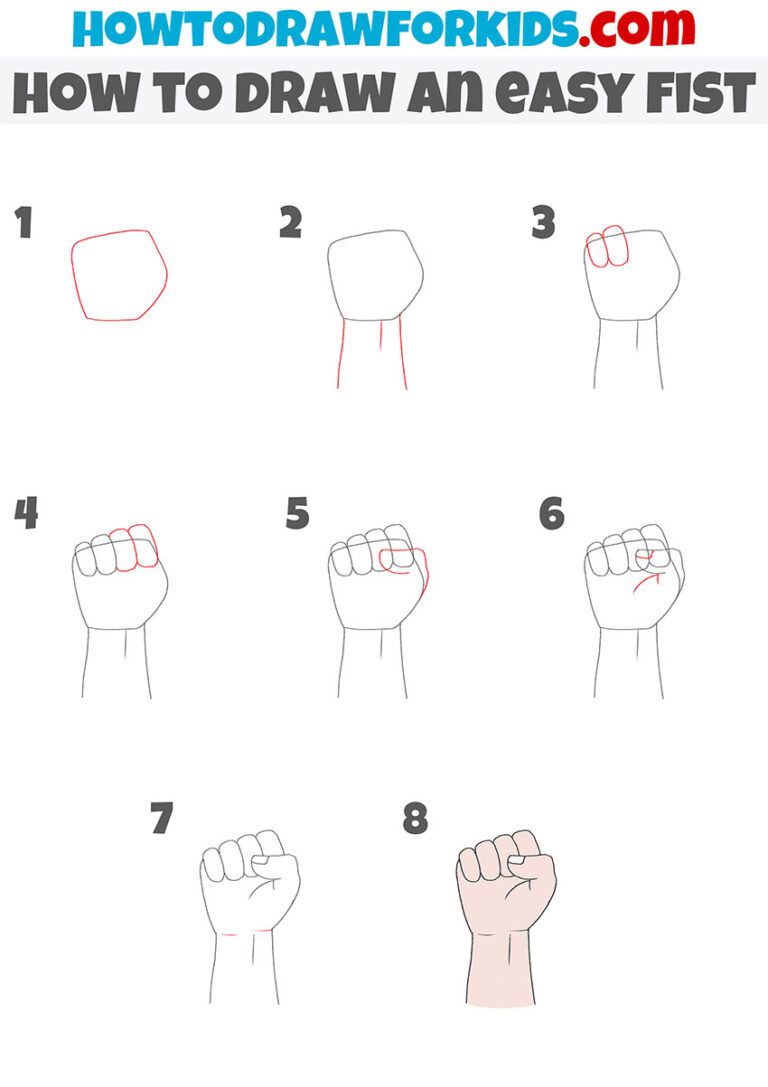
What are the basic steps to draw a fist?
The basic steps involve sketching out the general shape of the fist, often starting with a simple box or two. Next, you'll define the main forms of the knuckles and the curled fingers. After that, you'll add the thumb, making sure it's positioned correctly. Then, you refine the outline, adding details like skin creases and fingernails if visible. Finally, you apply light and shade to give the fist a three-dimensional appearance. It's a pretty straightforward progression, you know, from simple to detailed.
How do you add light and shade to a fist drawing?
Adding light and shade, or tone, to your fist drawing helps it look more solid and real. First, decide where your light source is coming from. Areas directly hit by light will be brighter, while areas turned away will be darker. Use different pencil pressures or digital brush opacities to create a range of tones, from light grays to deep shadows. Focus on the curves of the knuckles and the hollows created by the curled fingers to create natural shadows. Blending your tones smoothly, you know, can make a big difference in the final look.
Your Next Steps in Drawing Fists
So, as you can see, drawing a powerful and expressive fist is pretty achievable, even for those just starting their artistic journey. We've talked about breaking down the form into simple shapes, tackling different angles, and adding those crucial details like skin folds and shading. You've also got some good ideas about using references and exploring various styles, which is, you know, really helpful.
The key, as with any drawing skill, is to keep practicing. Don't get discouraged if your first few attempts aren't exactly what you hoped for. Every line you draw, every shade you add, it all builds your skill. You'll find that with a bit of consistent effort, your ability to draw a fist will improve quite a lot. You can discover how to draw a fist up in the air, or a realistic clenched fist, or even a fun cartoon one.
If you're interested in learning more about drawing hands in general, you know, not just fists, you can always learn more about hand anatomy on our site, and we also have a page dedicated to drawing different hand gestures. Keep sketching, keep exploring, and remember that every artist starts somewhere. You'll achieve a great result, for sure, and you'll be surprised how simple it is, even for beginners. Happy drawing!
For further inspiration and to see how other artists approach drawing hands, consider checking out resources like Proko's hand drawing tutorials, which offer a lot of helpful insights and visual examples.
- Gloss Blonde Hair
- Pussycat Pussycat Where Have You Been
- Hottest Qb In The Nfl
- Why Is Emma Darcy So Angry
- People Talking Without Speaking