Thinking about doing a little electrical work around your place? Perhaps you're looking to swap out an old light switch, or maybe you're putting in a new light fixture. It's a pretty common home improvement task, you know, and something many folks can manage with the right guidance. But, getting those electrical connections just right is quite important for safety and for making sure things work the way they should. That's where a good, clear picture guide, like a wire light switch diagram, really comes into its own.
A diagram for a light switch, you see, acts like a map for the electricity's path. It shows you where each piece of wire needs to go, which color connects to what, and how the whole setup comes together to make your lights turn on and off. It's almost like having a friendly helper right there with you, pointing out the way. This kind of visual aid helps take some of the guesswork out of things, making the whole process feel a lot less intimidating, especially if you're not someone who works with electricity every day. You want to be sure everything is connected up safely, after all.
So, whether you're a seasoned do-it-yourself enthusiast or just someone who wants to give a home project a try, having a solid understanding of how these diagrams work is a big plus. It helps you get the job done with a sense of calm, knowing you're following a tried-and-true method. We'll look at how these helpful pictures can guide your hands, making your electrical tasks feel more like a straightforward puzzle and less like a mystery, you know?
- Nakira Griner
- Vanna White Says Goodbye To Pat Sajak
- Trader Images
- Davids Bridal In Fayetteville
- Past Crossword Clue
Table of Contents
- Understanding Your Wire Light Switch Diagram
- What Parts Make Up a Basic Wire Light Switch Diagram?
- Getting Ready for Your Wire Light Switch Project
- How Do You Read a Simple Wire Light Switch Diagram?
- Tackling Different Kinds of Wire Light Switch Diagrams
- Are There Different Kinds of Wire Light Switch Diagrams for Various Setups?
- Making Sure Your Wire Light Switch Diagram Connections Are Safe
- What Should You Do If Your Wire Light Switch Diagram Project Runs Into Trouble?
Understanding Your Wire Light Switch Diagram
A wire light switch diagram, in a way, is like a secret language that electricians and home improvers use to talk about how electricity flows to make a light turn on. It's a visual representation, you know, that shows where all the individual strands of metal need to go. When you look at one of these picture guides, it's meant to give you a clear view of the entire path the electrical current takes from the source, through the switch, and on to the light fixture. This kind of clear communication helps prevent mistakes and ensures that your lighting setup works as it should, every single time. It's pretty neat, actually, how a few lines and symbols can tell such a complete story about electrical connections.
The main idea behind using a diagram is to take something that could feel a bit complicated and make it straightforward. Think about it: without a map, trying to find your way in a new city can be quite a challenge. The same goes for electrical work. A well-drawn wire light switch diagram gives you that precise map, showing you the exact route for each wire. This clarity helps you put things together correctly, which is super important when you're dealing with electrical currents. You want to be sure you're doing things the right way, so, a good diagram is your best friend here.
It's also about building confidence, you see. When you have a clear picture guide, you're less likely to feel confused or worried about making a wrong connection. This sense of security, knowing you're following a reliable plan, lets you focus on the task at hand. It's almost like having an experienced helper looking over your shoulder, quietly guiding you through each step. That, in essence, is the true value of a well-presented wire light switch diagram – it makes a potentially tricky job feel much more manageable and, frankly, quite satisfying to complete.
- Meaghan Rain
- Evaporative Cooler Or Portable Air Conditioner
- When Is Lou Gehrig Day Why Is It June 2
- Movies Like Overboard
- Mom Chop
What Parts Make Up a Basic Wire Light Switch Diagram?
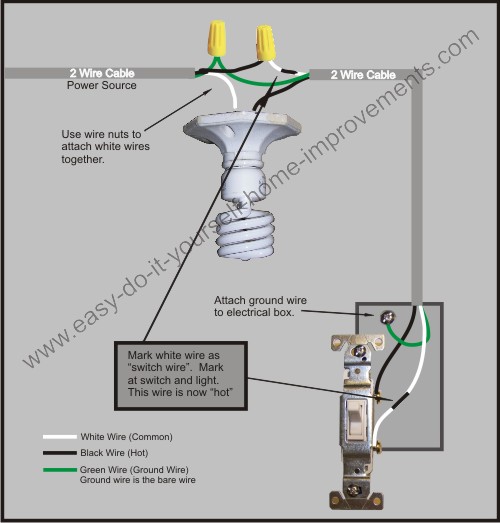
When you look at a basic wire light switch diagram, you'll see a few key elements that always pop up. First off, there are lines that stand for the wires themselves. These lines often have different colors or markings to show what kind of wire it is, like the hot wire (which brings the electrical push), the neutral wire (which takes the electrical push away), and the ground wire (which is there for safety, to guide stray electricity away). Then, there are symbols that represent the light switch itself, the light fixture, and sometimes the electrical box where all these connections happen. It's like a simple drawing language, basically, that anyone can learn to read with a little practice.
You'll also notice little marks or numbers near the wires or terminals on the switch. These tell you where each specific wire should connect. For example, a common light switch might have a dark-colored screw for the hot wire coming in, and another dark-colored screw for the hot wire going out to the light. The green screw, you know, is always for the ground wire. Getting these connections right is very important for the whole setup to work and, more importantly, to be safe. Every part on the wire light switch diagram has a purpose, guiding your hand to the correct spot.
Sometimes, these diagrams also show you how the power comes into the box, whether it's from the top or the bottom, or if it goes through the switch first or the light fixture. This detail helps you understand the overall flow of electricity in that particular part of your home. It's about seeing the bigger picture, not just the individual connections. So, knowing these basic parts of a wire light switch diagram gives you a solid foundation for any light switch project you might want to take on, making the job a lot clearer.
Getting Ready for Your Wire Light Switch Project
Before you even think about touching any wires, the most important thing to do is turn off the electrical current at your home's main breaker box. This is not just a suggestion; it's a must-do step for your own safety. You really want to make absolutely sure there's no electrical push running through those wires while you're working on them. It's a bit like making sure the car is in park before you get out. Once the power is off, you can then get your tools together. You'll likely need a screwdriver set, some wire strippers, and maybe a pair of pliers. Having the right handy items makes the job much smoother, you know?
Next, take a good look at your wire light switch diagram. Really study it. Try to picture how the wires will run inside the wall box. Identify the different wire colors and what they mean in your diagram. Sometimes, the wires in your wall might not be the exact same colors as what's shown in a generic diagram, so it's helpful to understand the function of each wire (hot, neutral, ground) rather than just relying on color alone. This bit of preparation helps you anticipate any little differences you might find once you open up the switch box. It's about being prepared for what's inside.
Finally, gather any new parts you might need, like the new light switch itself or any wire connectors. Make sure they are the right kind for your specific setup. Having everything laid out and ready to go before you start makes the actual work much more efficient. It helps you keep your focus on the task, rather than having to stop and search for something mid-project. So, a bit of planning, guided by your wire light switch diagram, goes a very long way towards a successful and safe outcome.
How Do You Read a Simple Wire Light Switch Diagram?
Reading a simple wire light switch diagram is a bit like following a recipe. You start by identifying the source of the electrical push, which is usually shown coming from a breaker box or another part of the electrical system. Then, you trace the path of the "hot" wire, often colored black or red, as it goes into the light switch. The diagram will show you which screw terminal on the switch this hot wire connects to. It's usually a dark-colored screw, you know, sometimes brass. This is where the electrical push enters the switch.
From the switch, the diagram will show another "hot" wire leaving the switch and heading towards the light fixture. This wire is often called the "switched hot" because its electrical push is controlled by the switch itself. When the switch is in the "on" position, this wire gets power; when it's "off," it doesn't. You'll also see the "neutral" wire, typically white, running directly from the power source to the light fixture, bypassing the switch entirely. This wire completes the electrical loop, allowing the current to flow back to the source. It's pretty straightforward, actually, once you get the hang of it.
And then, there's the "ground" wire, which is usually bare copper or green. This very important wire connects to the green screw on the switch and to the metal box, if you have one, and then continues to the light fixture. Its job is to provide a safe path for electricity in case of a fault, protecting you from shocks. So, when you look at a wire light switch diagram, you're essentially following these three types of wires, understanding their purpose, and seeing where each one connects. It's a clear visual story of how your light will get its power.
Tackling Different Kinds of Wire Light Switch Diagrams
While the basic single-pole switch is quite common, there are other types of light switches that you might come across, and each one has its own specific wire light switch diagram. For instance, if you have a light that can be turned on or off from two different spots, like at the top and bottom of a staircase, you're dealing with "three-way" switches. These require a slightly more involved diagram because they use special wires called "travelers" that go between the two switches. It's a bit more complex, but the diagram still breaks it down step by step, showing you the unique connections needed for these setups.
Then, there are "four-way" switches, which let you control a light from three or more locations. These are even more intricate, involving at least two three-way switches and one or more four-way switches in the middle. The wire light switch diagram for these can look a little busy, but it still follows the same principles of showing where each wire goes. It's about understanding the extra connections and how they work together to give you control from multiple spots. The diagrams are really good at laying out these pathways, making it easier to follow along.
You might also encounter diagrams for dimmer switches, smart switches, or switches with built-in outlets. Each of these has its own particular way of connecting, and the diagram will highlight those unique requirements. For example, a dimmer switch might have an extra wire for controlling the light's brightness, or a smart switch might need a neutral wire even if a regular switch in that spot didn't. So, while the core idea of a wire light switch diagram stays the same, the details change depending on the kind of switch you're putting in. It's always a good idea to find the diagram that matches your exact situation.
Are There Different Kinds of Wire Light Switch Diagrams for Various Setups?
Yes, absolutely, there are many different kinds of wire light switch diagrams out there, simply because there are so many ways to set up lighting in a home. The simplest one, as we talked about, is for a single light controlled by one switch. But then, as soon as you add another switch to control the same light, you need a whole new kind of diagram. These are called three-way switch diagrams, and they show how two switches work together, often using special wires to send the electrical signal back and forth between them. It's pretty neat how they manage that, actually.
And if you want to control a light from even more spots, like three or four different places in a large room or hallway, you'll be looking at four-way wire light switch diagrams. These are a bit more involved, as they typically use two three-way switches at the ends of the circuit and one or more four-way switches in the middle. The diagram for these setups really helps you keep track of all the extra connections and how they all link up to give you that multi-point control. It can seem a little confusing at first, but the diagram makes it clearer.
Beyond just the number of switches, diagrams also change for different functions. If you're putting in a dimmer, its wire light switch diagram will show specific connections for controlling the light's brightness. Smart switches, which you can control with your phone or voice, often have their own unique wiring needs, sometimes requiring a neutral wire that older switches might not have used. So, it's really important to find the exact diagram that fits the specific type of switch and the number of control points you're aiming for. Each diagram is custom-made, in a way, for its particular job.
Making Sure Your Wire Light Switch Diagram Connections Are Safe
Safety, when you're working with anything electrical, is the absolute top priority. Following your wire light switch diagram carefully is a huge part of that, but there are also some general safety habits that you should always keep in mind. First and foremost, always, always make sure the electrical current is turned off at the breaker box before you even think about touching any wires. Double-check it with a non-contact voltage tester, just to be super sure. This little step can save you from a very unpleasant surprise, you know?
When you're making the actual connections, try to keep the exposed part of the wire as short as possible, just enough to make a good, tight connection to the screw terminal or wire connector. Loose connections can cause problems down the line, including overheating, which is something you definitely want to avoid. Twist your wire connectors on tightly, making sure no bare copper is sticking out. It's about making sure every connection is solid and secure, just like your diagram shows. This attention to detail is quite important for long-term safety.
Also, pay attention to the colors of the wires and make sure they match what your wire light switch diagram tells you. If you come across wires that don't seem to fit the standard color codes (like black for hot, white for neutral, green or bare for ground), it's a good idea to pause and figure out what's going on. Sometimes, older homes have different wiring colors, or someone might have made a non-standard connection in the past. If you're unsure, it's always best to get a second opinion or look up more information. Taking your time and being careful is the best approach for any electrical work, honestly.
What Should You Do If Your Wire Light Switch Diagram Project Runs Into Trouble?
Even with the clearest wire light switch diagram, sometimes things just don't go as planned. If you find yourself scratching your head, or if the light doesn't work after you've made all the connections, the very first thing to do is turn off the power again at the breaker box. Safety first, always. Once the power is off, go back to your diagram and carefully retrace each connection you made. It's quite common to miss a small detail or to have a wire come loose, so a careful review can often spot the problem. Sometimes, just a little twist of a wire connector can fix things, you know?
Check that all your wire connections are tight and that no bare wire is touching anything it shouldn't be. Make sure the correct wires are connected to the correct terminals on the switch. Did you put the hot wire on the "line" side and the switched hot on the "load" side, if your switch has those markings? These little details can make a big difference. It's almost like a detective game, trying to find the one tiny thing that's out of place. Your wire light switch diagram is your main clue in this investigation, so keep it handy.
If you've gone over everything a few times and you're still not sure, or if you feel uncomfortable, it's totally okay to call in a professional. Electrical work, as a matter of fact, can be tricky, and there's no shame in getting expert help. Electricians have the tools and the deep knowledge to quickly figure out what's going on and get things working safely. Sometimes, the issue might be something beyond the switch itself, like a problem with the wiring inside the wall or at the breaker box. So, knowing when to bring in a pro is a sign of being smart and safe, and it's a perfectly good choice.
In summary, understanding a wire light switch diagram is a key step for anyone wanting to handle light switch replacements or installations. We've looked at the basic parts of these helpful picture guides, discussed how to get ready for your project by focusing on safety and having the right items, and learned how to follow a simple diagram. We also explored the different kinds of diagrams you might see for various setups, like three-way or four-way switches, and stressed the importance of making safe connections. Finally, we covered what to do if you hit a snag, emphasizing troubleshooting steps and knowing when to seek professional help. Having a clear diagram makes these tasks much more manageable and helps ensure a safe and successful outcome for your home's lighting.
- Who Is Touring With Alan Jackson
- Comedy Movies 2013
- Tool Beauty
- Meaghan Rain
- Please Noah Kahan Lyrics